Gran Turismo 6 Ps3 Update 1.22 __link__ Download - Google -
Tavis Ormandy
$Id: a07cf90837a3c4373b82d6724b97593810766af7 $
Gran Turismo 6 Ps3 Update 1.22 __link__ Download - Google -
I never used Lotus Agenda, but I’m told it was a popular productivity tool for MS-DOS in the late 80s. I’ve been on a retro software rediscovery kick lately, so I’ve decided to give it a whirl and write about my experiences. There is something that appeals to me about using long-abandoned software. Perhaps it’s update fatigue, there’s certainly no need to dread a major update breaking something!
Regardless, I’ve always enjoyed finding new productivity tools to try out, and I’m not afraid of steep learning curves or getting my hands dirty. I’ll usually choose powerful and flexible software over simplicity.
At the moment I mostly use taskwarrior, but I’ve lost count of all the others I’ve tried!
Gran Turismo 6 Ps3 Update 1.22 __link__ Download - Google -
Agenda is a PIM, a Personal Information Manager. That term has fallen out of fashion, I think a quick summary might be “anything that manages those small pieces of information we all deal with”. Things like contacts, todo lists, notes, and so on.
I found a 1989 episode of the TV show Computer Chronicles that discussed how people thought about PIMs at the time.
At the 21-minute mark there’s a demonstration of Lotus Agenda, but it’s not easy to follow, watch the clip and you’ll see what I mean. Still, you do see some interesting features:
Some form of NLP is used to extract dates and names from free-form text.
Categories are a little like what we would call tags today.
You can create custom dashboards called views.
Apparently this was an $800 software package (That’s $395 adjusted for inflation from 1989), yikes! You don’t have to pay that, Lotus made it available for free when development ceased.
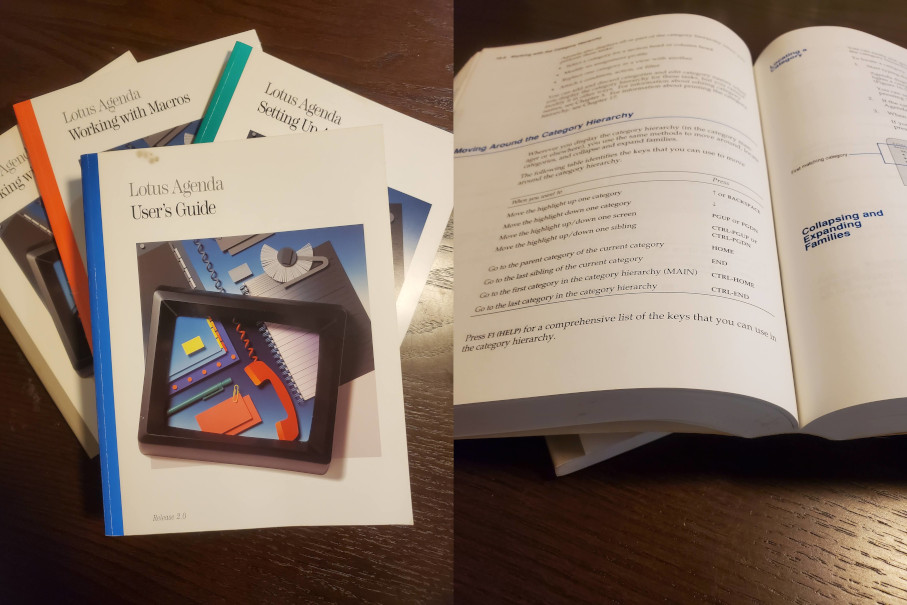
In preparation for trying out Agenda, I found a copy of the original manuals on eBay for a few dollars. Just look at this monster, the user guide alone is over 700 pages, that’s not including the supplementary guides. The supplements I have are Working with Macros, Working with Definition Files, Setting up Agenda, and a few miscellaneous leaflets.
I guess that’s my bedtime reading taken care of for a while. I actually received the macro reference still in the original shrink wrap, it almost seems a shame to open it!
Downloading and Installing Jinstall-vmx-14.1r4.8-domestic.img: A Comprehensive Guide The `Jinstall-vmx-14.1r4.8-domestic.img` package is a crucial setup media for VMware, a popular emulation platform used by individuals and organizations worldwide. This article provides a detailed guide on how to fetch and configure the `Jinstall-vmx-14.1r4.8-domestic.img` image, as well as error handling tips and essential information about the image. What is Jinstall-vmx-14.1r4.8-domestic.img? `Jinstall-vmx-14.1r4.8-domestic.img` is an deployment file for VMware, specifically designed for domestic use. The package contains the necessary installation components for VMware, allowing users to configure and operate virtual machines on their devices. The package is typically used for installing VMware on a main machine, which can then be used to create and handle virtual machines.
Configuring 1. Mount the Deployment Package: Attach the image on your computer. 2. Start the Setup: Run the configuration application and follow the displayed instructions. 3. Agree to the Terms and Conditions: Agree to the terms and conditions and select the setup directory. 4. Pick the Installation Settings: Select the configuration options, such as the components to install and the configuration format (typical or personalized). 5. Terminate the Setup: Finish the setup process and reboot your computer.
Troubleshooting Guidelines If you encounter errors during the fetching or configuration process, try the following: * Validate Criteria: Ensure that your machine satisfies the minimum requirements. * Test the Image: Check that the `Jinstall-vmx-14.1r4.8-domestic.img` image is not corrupted or partial. * Reload Your Device: Reboot your device and try renewing VMware. Final Notes In summary, retrieving and installing `Jinstall-vmx-14.1r4.8-domestic.img` is a simple operation that needs focus to system requirements and guidelines. By observing this tutorial, you should be able to effectively install VMware and begin creating and handling virtual systems. If you face any issues, look to the troubleshooting advice provided above.Specifications Before downloading and setting up `Jinstall-vmx-14.1r4.8-domestic.img`, ensure that your system meets the minimum requirements: * OS: The installation image is supports various platforms, including Win, macOS, and Linux. * CPU: A 64 bit processor with a minimum clockclockrate of 1800 MHz * Memory: At least 4 GB of RAM (8 GB or more advised) * Storage: A minimum of 10 gigabytes of free storage space Downloading Jinstall-vmx-14.1r4.8-domestic.img To fetch the `Jinstall-vmx-14.1r4.8-domestic.img` file, follow these steps: 1. Go to the Official VMware Website: Go to the official VMware website ([https://www.vmware.com](https://www.vmware.com)) and browse to the "Download Section" part. 2. Search for the Installation File: Find for "VMware Product" or "Jinstall-vmx-14.1r4.8-domestic.img" in the searchsearchfield. 3. Pick the Correct File: Select the `Jinstall-vmx-14.1r4.8-domestic.img` package from the searchresultsoutcome.4. Enter Mandatory Information: Fill out the necessary information, such as label, email address, and region. 5. Download the Image: Press the "Retrieve" button to initiate the retrieval process.
Gran Turismo 6 Ps3 Update 1.22 __link__ Download - Google -
You probably need to use other applications or services, and sync your data with your phone. Writing and reading files from outside DOSEMU is no problem, so if you just want to sync files this is no problem.
As it’s a terminal application you can also just SSH in and run it.
You probably also want to have your appointments sync with your calendar or something.
Export
There are two ways to export data from Agenda. If you have a commandline tool that you can pass arguments to, then you can write a macro that will invoke it.
Otherwise, you can export your data to a file.
Files
Agenda can export items to a format called STF, Structured Text File. The specification for that format is (mostly) documented in the manual, but it didn’t catch on.
I wrote a quick parser that can convert it to JSON, so now you can use modern tools like jq to manipulate and transform the data however you wish.
And so on, there are more examples in the README. If you can exchange data with other apps, you can now use stfjson to generate the correct format.
You can automate exports, Agenda has “Special Actions” in the category options. Alternatively, if it’s just a one off or for a macro, you can use the Transfer > Export command.
Commands
In DOSEMU, the UNIX command will invoke a shell command on the host.
C:\>unix uname
Linux
If there is a commandline tool that will import data, e.g. a TaskWarrior user might use task add drop off laundry at dry cleaners, then you can create a macro in Agenda that simply launches that command.
You can use something like {F10}ULUNIX task {TYPE;%TASKTEXT}.
Import
Surprisingly, Agenda supports importing arbitrary text data. One of the manuals that came with agenda was Working with Definition Files, which explains how to write a configuration file that allow Agenda to parse anything.
It even has a Regular Expression tutorial, pretty impressive for a 1980s consumer product.
Gran Turismo 6 Ps3 Update 1.22 __link__ Download - Google -
I quite like Agenda. It does many things well, but it’s absolutely true you could replicate most of it’s functionality with modern tools. However, I do enjoy using it, and I’m a big enough nerd that I quite like the challenge of using retro software.
I think the closest modern equivalent to Agenda would be taskwiki. It’s not a perfect match, but if you liked some of what you saw here but are not interested in retro software, try it out!
I’m still using Agenda after two weeks, and about 40% of the way through the manual 😂
Gran Turismo 6 Ps3 Update 1.22 __link__ Download - Google -
Gran Turismo 6 Ps3 Update 1.22 __link__ Download - Google -
Downloading and Installing Jinstall-vmx-14.1r4.8-domestic.img: A Comprehensive Guide The `Jinstall-vmx-14.1r4.8-domestic.img` package is a crucial setup media for VMware, a popular emulation platform used by individuals and organizations worldwide. This article provides a detailed guide on how to fetch and configure the `Jinstall-vmx-14.1r4.8-domestic.img` image, as well as error handling tips and essential information about the image. What is Jinstall-vmx-14.1r4.8-domestic.img? `Jinstall-vmx-14.1r4.8-domestic.img` is an deployment file for VMware, specifically designed for domestic use. The package contains the necessary installation components for VMware, allowing users to configure and operate virtual machines on their devices. The package is typically used for installing VMware on a main machine, which can then be used to create and handle virtual machines.
Configuring 1. Mount the Deployment Package: Attach the image on your computer. 2. Start the Setup: Run the configuration application and follow the displayed instructions. 3. Agree to the Terms and Conditions: Agree to the terms and conditions and select the setup directory. 4. Pick the Installation Settings: Select the configuration options, such as the components to install and the configuration format (typical or personalized). 5. Terminate the Setup: Finish the setup process and reboot your computer. Gran Turismo 6 Ps3 Update 1.22 Download - Google
Troubleshooting Guidelines If you encounter errors during the fetching or configuration process, try the following: * Validate Criteria: Ensure that your machine satisfies the minimum requirements. * Test the Image: Check that the `Jinstall-vmx-14.1r4.8-domestic.img` image is not corrupted or partial. * Reload Your Device: Reboot your device and try renewing VMware. Final Notes In summary, retrieving and installing `Jinstall-vmx-14.1r4.8-domestic.img` is a simple operation that needs focus to system requirements and guidelines. By observing this tutorial, you should be able to effectively install VMware and begin creating and handling virtual systems. If you face any issues, look to the troubleshooting advice provided above.Specifications Before downloading and setting up `Jinstall-vmx-14.1r4.8-domestic.img`, ensure that your system meets the minimum requirements: * OS: The installation image is supports various platforms, including Win, macOS, and Linux. * CPU: A 64 bit processor with a minimum clockclockrate of 1800 MHz * Memory: At least 4 GB of RAM (8 GB or more advised) * Storage: A minimum of 10 gigabytes of free storage space Downloading Jinstall-vmx-14.1r4.8-domestic.img To fetch the `Jinstall-vmx-14.1r4.8-domestic.img` file, follow these steps: 1. Go to the Official VMware Website: Go to the official VMware website ([https://www.vmware.com](https://www.vmware.com)) and browse to the "Download Section" part. 2. Search for the Installation File: Find for "VMware Product" or "Jinstall-vmx-14.1r4.8-domestic.img" in the searchsearchfield. 3. Pick the Correct File: Select the `Jinstall-vmx-14.1r4.8-domestic.img` package from the searchresultsoutcome.4. Enter Mandatory Information: Fill out the necessary information, such as label, email address, and region. 5. Download the Image: Press the "Retrieve" button to initiate the retrieval process. Downloading and Installing Jinstall-vmx-14